
Dobrý, ale tohle šlo nastavit už i E-Tracu. Výhoda tam ještě byla, že se daly načíst ID cílû automaticky, tedy, mávnutím nad cílem a buď si ho vymáznul nebo přijal. Ovšem, když to bylo velké železo, tak se to stejně ozvalo vysokým tónem do barvy. To jsem kopal podkovy a kované hřeby, jen to frčelo. 😊😄⛏
Manticore to the Screw - Part 3 and 4 - Discrimination and ferous limits
Categories: Detektor kovů Minelab Manticore
In this double part we will discuss discrimination and ferrous limits. There's basically nothing to discrimination, but we'll certainly cover ferrous limits a few more times, as we're still playing with the perfect setting of their lower level and having a lot of fun with it.
Discrimination
We'll start with the easy one, and that's discrimination. With Manta, you can basically exclude individual colored metals one ID number at a time, or close off entire groups of IDs. It's all done in nice columns, but that's about it. Personally, I never discriminate against "color" targets. The only exception might be cokes. But they report ID 1 on Manta, and even then only in high sensitivity modes like "low conduct" in particular. Everywhere else, it's iron or nothing. So unless you downright need to get rid of some annoying target at a location, I would definitely use discrimination only rarely.

Ferrous limits
This is a feature that is brand new. There are two ways to approach it. Either you use the preset values and there you are only advised to reduce the lower level to the number 3, or you start playing around a bit. For those who don't like to spend time experimenting, the preset option is probably a win. And for those of us who like to play around, we'll probably write a few posts about setting the lower limit.
So how does it work
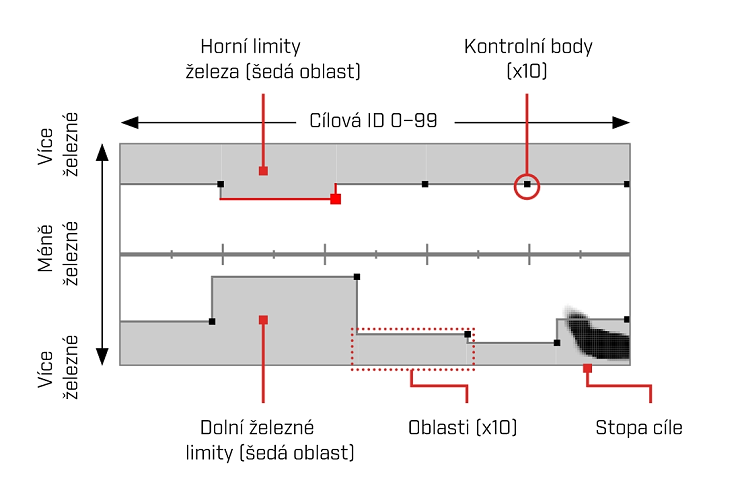
Upper limit: is basically the classic discrimination of iron, i.e. the most common iron objects. The larger the "strip" you create, the more certain you are that no such handcuff, or you will hear the target in a deep tone, or the tone you have chosen.As with classical discrimination, it is better to be sparing with the limits and not to set an unnecessarily large width. In addition, with the Manta you always see the target's "footprint" on the LCD, so if you hear something trying to crawl through your upper limit and theyou can see a giant smudge somewhere in the upper limit, you are 100% sure that it is a decent piece of, let's say, standard iron.
Lower limit: The lower limit works as a discrimination of difficult iron targets, but it also works like the FE bias feature users know from the Equinox series. But with the Manta, this feature is more advanced, contains far more possible IDs, and most importantly, you can customize it.
If we were to follow the preset pattern, we basically change the FE bias number by enlarging or shrinking the bottom pattern as with the Equinox. Actually, the function is more advanced, but for a basic understanding, this is how we can think of it. In the video, you'll see it incrementally increasing or decreasing. If you stick to the preset pattern, I would stick with the level 3 setting.
The lower limit is just something you haven't encountered before. If I try to sum it up as simply as possible, the lower limit closes problematic irons like various flats with holes etc, but at the same time the level setting raises or lowers Iron Bias. Because of this, you may find that some tiny little low water target is reported as a color on the edge of the lower limit setting. You may then notice that whether you shrink or enlarge the pattern, the targets still report at the edge of your setting.
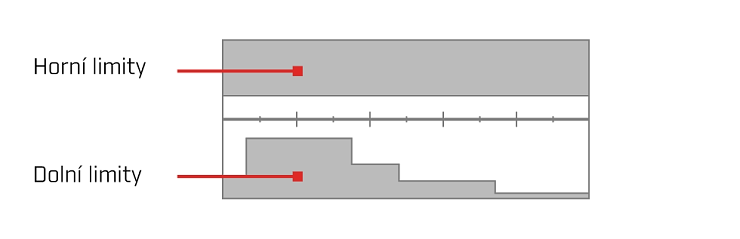 The image shows the preset upper and lower limit levels. Both the upper and lower levels are better set to a lower level in our conditions.
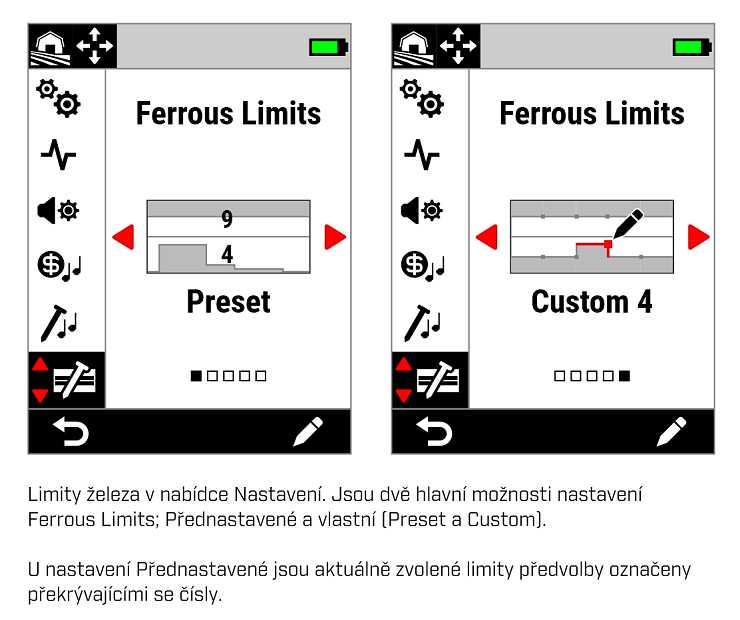 On the left the preset values, on the right the manual settings.
Manual editing of Ferrous limits
But the real fun comes when you start adjusting the limits, especially the lower one, yourself. Here I would just like to point out that you should start doing this once you have something set up so you are sure of what you are doing :)
By adjusting the upper limit you basically only affect the size of the rejected standard irons. From level 3 onwards you'll be able to eliminate most of it, and I wouldn't choose a higher setting than number 7. With manual editing you can allow a specific iron target, for example some modern coin with an iron core.
By setting a lower limit, you affect both the acceptance of problematic iron targets, but also deeply buried, particularly low-value objects, such as the finest silver coins. Therefore, we recommend that even when editing manually, you always be sparing with the settings, especially on the left side of the chart.
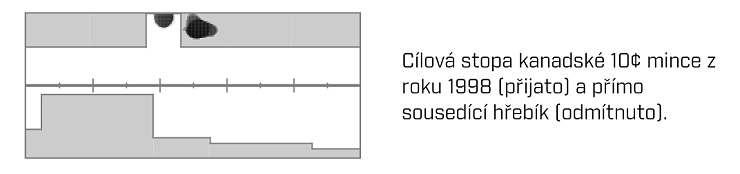
The picture shows how to create custom patterns for both the lower and upper limits. The image is originally from Minelab and the interesting thing about it is the hinted target trace in the bottom right corner. Peter and I agreed that we are not aware of any objects reporting here. Probably something specifically Australian :)
Manticore to Screw 3 - Discrimination and Ferrous Limits
Manticore to screw 4 - Manual editing of Ferrous limits
The article is included in categories:
- Archive of articles > Metal Detectors - Reviews and Tests > Minelab – tests and reviews > Detektor kovů Minelab Manticore
Post


Mildas: s Etrakem jsem co se týká železa neměl problém. Měl jsem trochu diskriminaci pravý spodní roh a pohoda.
Zdá se mi, že u CTX/Etracu je ta 2D identifikace promakanější. Navíc díky rozsahu 50 Co a 35 Fe lze defacto identifikovat až 1750 různých ID, to je řádově víc než na Mantikóře. Hlavně podle polohy cíle na 2D grafu šlo docela slušně odhadovat o jaký druh cíle jde. No a konečně na 2D obrazovce šlo oddiskriminovat prakticky cokoliv. Tím myslím třeba několik cílů se stejnou vodivostí, ale různým obsahem Fe.

Kluci, výborně to vysvětlujete. Doufám, že vyjde ke konci také video pro ty, co chtějí s Mantou jít hned hledat s optimálním nastavením pro začátečníky. Díky vašim zkušenostem z terénu by se to mohlo podařit. Ještě se chci zeptat, zda můžete prozradit přibližný počet čekajících na M. a zda nevíte, jak je to s dodávkami M. k vám. Jestli se to bude v průběhu roku lepšit nebo to bude celou dobu na příděl pár kusů. Zajímá mě to kvůli případné objednávce, jestli se musím zařadit na pořadník hned nebo ještě mohu počkat. Díky.
Tak jsem se mrknul do manuálu k Mantikóře. A nějak nemohu najít volbu zvuku LONG. To tam fakt není? Hmm, jako hledači a prodejci Minelabu byste měli vědět, že právě tahle možnost nastavení byla a je jedna z největších devíz vlajkových lodí Etrac/CTX a defacto celé řady Explorer a těm protinožcům to vysvětlit. Že není k dispozici na Equinoxu 900 bych pochopil, ale na Manticore to je za mě fail.


Odpovím snad na vše .)
1. Na E-Tracu a CTX je pouze 2D diskrimnace. Prostě pouze zavíráte nějaké číslo. Je to tak starší technologie a abych reagoval na to co bylo napsáno, je tedy méně promakaná :). Myslím, že tento první pohled je ale ok, jelikož i mi s Petrem jsme na to nejdříve hleděli s určitým nepochopením :)
Tudíž horní limit normálně zavírá železa. Tak jak to znáte. Spodní limit je ale uplně jiný příběh, misto aby jste jenom zavřeli ID a s nimi třeba i řadu dobrých cílů z hloubky, tady je to daleko sofistikovanější.
Tomísek: long si můžeš "vyrobit" ostatně stejně jako cokoli dalšího. V pátek vyjde video, které bude právě o audiu a tam pochopíš, že možnosti jsou u Manty zcela jinde než bylo u modelů jako byl E-Trac nebo CTX. To v podstatě nejde vůbec porovnávat :)
Elmara: pokud se tam nechá nastavit prodloužení audio odpovědi cíle, tak se omlouvám. Já to tam nenašel. To, že si jde hrát do zblbnutí s tónama a nastavit tam třebas odpověď Conduct ala Etrak (železa vyšší tón, barvy nižší), tak to jde. Ale mě jde o klasický Long.
Je to kombinace nastavení příčky, režimu a časovky. Variabilita je obrovská. I když si to řada hledačů neuvědomuje, ten long/smooth je v podsatě pouze prodloužení časovky 
Aha, tak na to bych nepřišel. Počkám si na video. Koukám, že v jednoduchosti je síla. Proč normálně k těm zvukům Normal, Ritch atd. nedali Long a v submenu nastavit protažení signálu v ms? No a to se svého času vznášela nad Trakařem mantra, jak je těžký na nastavení. Zlatý voči.
Největší efekt je kombinace režimu depth/režim audia/ rychlost obnovy/. Tak si jde hrát s nastavením až do nějakého požadovaného výsledku. To u tracu možné nebylo, tam jsi měl v tři napevno přednastavené věci.
Musím Marku uznat, po shlédnutí 3 a 4, následně 5 a 6 dílu Manty, že jsi měl pravdu, skutečně jde nastavit úplně všechno, je to neskutečné. Díky za ta videa, Petrovi jde dobře rozumět a slyšet co říká, což velmi oceňuji, ale, protože jsou to videa výuková, ve své podstatě, zvolte prosím, klidnější lokality.
K úplné dokonalosti se určitě dopracujete a je škoda té práce, kterou jste tomu věnovali i času, když je tam slyšet zbytečně okolní hluk nebo silný vítr. Jsem za ta videa moc rád a oceňuji to, tyto informace jsou opravdu skvělé a až počasí dovolí, jistě se dočkáme ještě mnoha překvapení, která Manta ještě dokáže. Držím palce, ať se dílo daří ! ✊👍😊
Díky za vaši práci, školení, rady a videa, která jistě pomohou nám všem.
To Mildas: odjeli jsem si to natočit do "tepla" v Chorvatsku, ale většinu času tam bylo hůř než tady :) Prostě pech :) By to tedy můj nápad, jako že v lednu tady u nás mráz a sní a tam +10°C a slunce... když jsme se vraceli, tak na dálnici byly 30km omezení a foukalo tak, že nám dodávka skákala s pruhu do pruhu.
Každopádně, jelikož mohu myslím prozradit, že se chystá čeština (jelikož ten přelad děláme sami) a snad by mohla být v prním upgrade, tak to asi pak vše natočíme ještě jednou v čj. Navíc asi tam přidáme další naše poznatky, jelikož jak s detektorem chodíme další týdny, tak jsou i nějaké informace navíc co by jsem mohli říci.
Tohle se asi bude stávat častěji. Manta má velice otevřené prostředí a je tam tak prostor přidat takřka cokoli. On je pak spíše problém, aby toho nebylo už moc. :)