
Asi mi utekla někde cena,kolik ta berla koštuje?Díky 
Metal Detectors Fisher Fisher F44 (F22) test by Pavel Divis
Categories: Fisher - Reviews and tests , Detektor kovů Fisher F44 a F22
FISHER Labs introduced three new F-Series metal detectors in July 2015. The detectors are equipped with features and modes that you probably wouldn't look for in this price range, as these are only available on detectors much more expensive (volume control, numeric ID display, selectable sound modes with 4 tones + VCO, 3 preset programs + Custom, FeTone™, setting memory, waterproof, etc.).
The new Fisher F44 replaces the existing F4 detector, the F22 replaces the older F2, and the new F2 also comes with an additionalF11, which is the most affordable metal detector of this American brand. The company boasts that it is the 1st and oldest metal detector manufacturer in the world, which is also stated in its logo - 1st Name in Metal Detecting Since 1931.
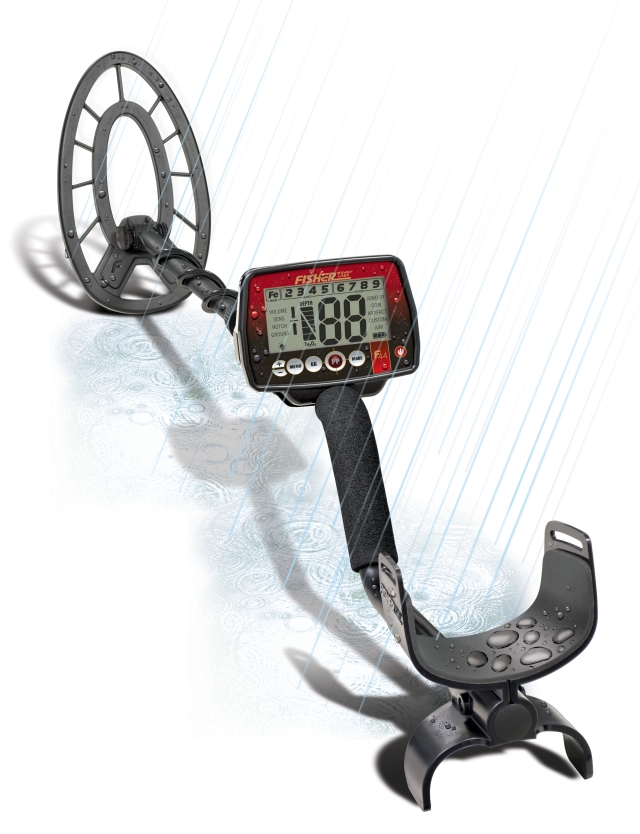
Fisher F44 It is the most powerful and most equipped of this trio of novelties (the F22 is very similar to it technologically and user-wise; compared to its bigger sibling it lacks only manual ground tuning, separate All-Metal, display backlight and the triangular probe is smaller - instead of 30cm it is 25 centimeters). Both models have FeTone™, which is sure to be welcomed and appreciated by most searchers. This useful feature, which until now has only been fitted to the top models Fisher F75 Ltd V2.0, F75 Ltd V2.0 and F19 Ltd, allows the iron tone responses to be muted, while the volume of coloured targets remains the same. What else do the new detectors boast? How about 3 preset search programs + an optional Custom mode, where custom tone settings for each conductivity category can be selected and stored in memory. Furthermore, it is possible to combine and select from 4 tones + VCO. It is this variable tone that most professionals use on their F75 LTD, F75 and F70 (the F19 LTD and Goldbug DP Pro also have a VCO tone) to set the non-ferrous metal signal. So things can be estimated not only by the digital display, where the numbers correspond to the likely electromagnetic conductivity of the object (along with its shape, size and distance from the probe, of course), but also just by the sort of analogue audio output. The tones can be set in the Custom program so that the irons grumble monotonously and the coloured targets whistle upwards instead. According to this VCO variable and not just flat digital tone we will be able to estimate much more confidently the size, shape and composition of a localized object in the ground, as well as its distance from the probe. With the VCO tone we will thus get infinitely more information than we get from a detector that offers only normal flat digital tones.
And now for the actual test of the new Fisher F44. As always, my first test after assembling the detector took place in the sandbox located nearby, which I often fight over with moms, their kids and their babies. However, they have all known me there over the years and many times have even been able to appreciate when I have occasionally found a scoop or an Englishman by their kids while demonstrating or testing detectors. The detector runs on two 1.5V pencil batteries and the instructions say it will last 25 hours of operation. If you use good quality alkaline monocells (some of the best and cheapest have Liedl - I first read this in d-Test and I can only confirm), this kind of endurance is not really a problem.The batteries are quite easy to install. When the door on the back of the control panel is pushed open, a case pops out, and a hinged handle pulls it out.After inserting the 2 - AA monocells (be careful not to switch the contacts - you won't break the device, but it won't work) the case is pushed back in and everything is secured with the door. Take care when installing or replacing the batteries, because if you want the detector to be waterproof, the door must be closed properly. The manufacturer strongly recommends using alkaline batteries or good quality rechargeable batteries. When I played with the detector, the alkaline monocells lasted more than the advertised 25 hours of operation. I have not tried or tested rechargeable batteries, but normally they last about 50% of the time of alkaline monocells. It is understandable that with frequent use of display lighting, the life of any batteries will drop noticeably. So we've installed the batteries and we're good to go.
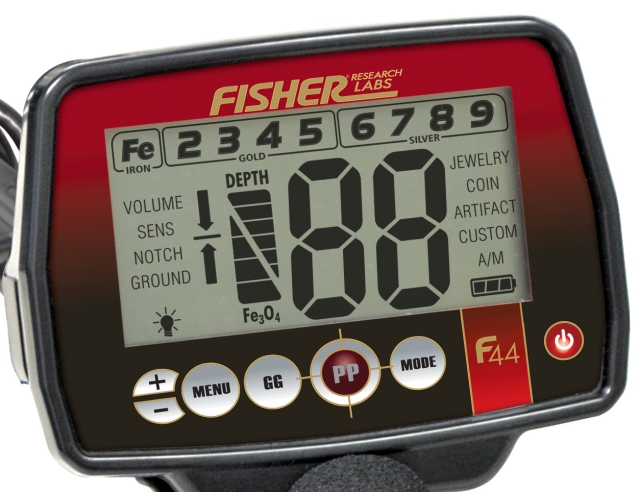
The detector is switched on by pressing the button - switch on the right side of the control panel. When the unit is switched on, the display starts to run numbers, there are 9 in total. If I didn't know what was going on from the new Fisher F19 LTD as well as the V2.0 versions of the F75 and F75 LTD, I admit I would probably be a bit of a deer. I'm sure all of us have heard at least once the sad story of someone somewhere having their detector stolen and then that someone going on to variousand asked for information about the stolen device. The problem was always that all it took was to remove the S/N sticker from the panel, bar or battery compartment (location varies by brand) and the chances of verification were slim. What Fisher does now is much smarter and more practical. This is because the numbers that run on the display when the unit is switched on are just the serial number of the detector, loaded directly into the software, and nobody can remove them. So if there is now a suspicion that the detector in question is stolen, just switch it on and see for yourself. Every distributor and, in fact, dealer keeps a database of sales in connection with the warranty card and can therefore easily trace to whom the detector was sold and what S/N it had.
So the detector is on and we have seen the serial number. VOLUME is the first category that appears on the display after switching it on and pressing the MENU button. Using the + and/or - buttons, the volume can be quickly and easily adjusted according to individual needs. The volume level will be indicated by a number on the display between 1 and 20. At settings from 1 to 9, both ferrous and non-ferrous signals are gradually amplified, and at settings of 10 and above, the FeTone™ function begins to operate. How does it work? When set to 10, the volume is full for non-ferrous metals and zero for ferrous. From 11 - 20, the signals for ferromagnets are gradually amplified and then at 20 the ferrous signals are full as well as the non-ferrous. I would recommend setting it to 8 to start.
The next thing we'll set is the sensitivity. When we press the MENU button again, the display will now highlight the SENS icon. We'll adjust this in the same way as we did the volume before. Always adjust the sensitivity so that the detector operation is stable without false tones caused by electromagnetic interference. In the event of such interference, the - button must be pressed until the instrument calms down . If we want to achieve more power/range, we can try to increase the sensitivity by pressing +. To start with, try tuning to 12. There are 2 more categories in the left column of functions, NOTCH and GROUND.
I personally don't use the NOTCH or discriminating windows function because the value /number of the electromagnetic conductivity of the detected object varies considerably depending on the position of the fit. For example, if a coin is flat, it will be evaluated with a different number (and detected much deeper) than if it is perpendicular to the probe. Thus, it can even easily happen that it is included in another block, and if this one is filtered out, the detector will be silent, not reacting to it, and we have no idea what nice thing in the ground we are leaving for someone else.
The GROUND or ground tuning function is set by typical pumping of the probe and we can do this either automatically at any time during the search in discriminative mode or manually in All-Metal. For quiet operation and accurate discrimination, the ground must always be accurately balanced - press the GG button while simultaneously pumping the probe horizontally above the ground several times between 0 - 20cm. The last function in the left column is the display illumination. It is accessed by clicking Menu until the light bulb icon is highlighted. We can illuminate the LCD screen with a pleasant red hue, plus use + and - to select the intensity of the illumination in steps from 0 - 5.
TheFisher F44 offers a total of 3 preset search modes + 1 individual one with memory. Pressing the MODE button will not select/highlight the desired search mode. Use the ARTIFACT program to signal all metals , if you don't want to hear small metals, select JEWELRY. Use the programs to select the Discrimination (resolution) level of the metals, i.e. what you want to hear, detect and what you do not. The instrument reports different metal objects with different tones and at the same time a 2-digit number always appears on the display, which expresses the value of the electromagnetic conductivity of the object (since it is a motion VLF metal detector, to detect it is of course necessary to move the probe or, conversely, to move the tested object). The low bass tone is emitted by all ferromagnets such as iron, steel, etc., the mid tone by thin and small objects made of gold, silver and bronze (they are registered as alu foil, tinfoil), as well as all alloys and most coins. Pure metals such as silver, copper and aluminium are signalled with a high tone. However, iron and alloy objects of larger/compact sizes and roundround shapes such as round nail heads, washers and nuts, horseshoes, large cans, bent nails, corks, etc.
For finding all non-ferrous metals, in my opinion and experience, custom tonal differentiation, which can be set using the individual CUSTOM mode. Any category here can be assigned one of 5 possible tones. One option is to assign a variable VCO tone to all "colored" objects, which isThe VCO tone varies in pitch and intensity depending on how big the object is, how far it is from the probe, and what shape it is. From the characteristic described above, this sound output gives us a vthe object in the ground than any other flat digital tone. I use this tone setup myself (as do all my friends) with the Fisher F75 Ltd V2.0, F75 V2.0 and F70 DD and therefore highly recommend it. Press the MODE button until the CUSTOM finder is activated. Press and hold the MODE button again (for more than 1 second) until the first Fe category flashes on the upper discriminator number scale. Use + or - to select one of 5 tones - 0 (variable VCO), 1 (bass), 2 (low), 3 (medium), 4 (high). When you're done with your selection, press MENU again to move to the next subsequent categories - 2, 3, 4, 5, 6, 7, 8, 9 and assign the desired tone to them in the same way. To exit the menu or to exit the setting, press MODE. Oh, and lest I forget, it's perfect that this custom setting stays in the detector's memory.
So now, here's what I'm looking for with this and how I would recommend it: Set the iron (Fe) category to deep bass tone = number 1. For all other categories 2 to 9 (non-ferrous metals), use the +/- button to assign a variable VCO tone = 0. If you would like to additionally audibly distinguish things with the highest conductivity of 90+ (as signalled by e.g. large silver coins, but with higher mineralization also "hot stones" and ferromagnets of larger dimensions) from other non-ferrous metals, assign a high tone, i.e. 4, to category 9. Press MODE to finish setting the tones.
PRACTICAL TEST
I scattered a few metal objects around on the ground, such as various coins, nails, an Au ring, a fragment of an Ag earring, crumpled tinfoil, etc., and began analyzing them with the probe to see how they were evaluated by the detector. Each metal target, object is instantly indicated by the fast microprocessor coil with the appropriate tone and on the numericalnumber/category corresponding to the electromagnetic conductivity, shape and size of the located object appears on the numerical display at the top of the LCD. If the detector is not in motion and not near the ground, it should not emit any tones. If it does, the sensitivity is probably set too high for the conditions and should be reduced. False signals/tones are usually caused by electromagnetic interference/interference, ground minerals, or high concentrations of scrap metal. To get rid of them, press the - button for SENS until the interfering tones disappear.
Here I would like to offer a general advice about detector settings. If possible, and the concentration of ferrous trash is not too high, never filter Fe signals and look in CUSTOM or ARTIFACT. That's the only way to be sure you're not running over small colored stuff masked by larger iron.
After receiving an audio signal, a two digit number on the display, and a category number on the numeric scale, we can guess if we have iron or non-ferrous metal under the probe. At this point I will return for a moment to the 29x17cm probe that the Fisher F44 is equipped with. This is a new type of probe, it is somewhere between a concentric and a double D in properties. The manufacturer refers to it as triangular and it actually has that name because of its shape. Both the larger transmitting and the smaller receiving coils are triangularand because of this the probe has both excellent ground coverage and excellent separation and range, which is greatest in the centre of the probe. To more accurately locate where the object is in the ground, I examine the target with the probe tip (at the location of the upper of the inner receiving coil) in both axes, or I use the Pinpoint function.As most searchers know how to use Pinpoint, I will repeat the technique for newcomers. First place the probe on the ground about 20cm from the localized spot and then press and hold the center PP button. We locate the exact target location by the highest tone and lowest number on the display. This number represents the approximate depth of the object in inches (1" = 2.5cm; depth is calibrated for coin-sized objects). The advantage of Pinpoint is that the probe does not need to be in motion and can be stopped at any time. This allows us to accurately locate the object, but more importantly and most importantly estimate its size, shape and depth.
I could convince myself of the advantages of the VCO "analogue" tone when I tested the detector at my cottage in Slapy. Since 1993 I have had a small test garden there, where I have been using the detector at various depths and positions.I planted some coins and things that I had once found and wanted to continue to find. I set up the detector exactly as I describe above and chose Custom as the search mode - iron deep tone and color variable VCO. Each time a signal was heard, I subsequently started playing with other modes and tweaking the volume and sensitivity settings in all sorts of ways. Of course I tried to keep the latter as high as possible, but I also wanted the instrument to be as stable as possible without false tones. At the cottage, where there are not many sources of electromagnetic interference, it is possible to adjust the sensitivity almost to the maximum and clearly, much higher than, for example, somewhere around Prague or other larger agglomeration with clouds of electromagnetic sources.
A long time ago I vowed that I do not want and will not give any range numbers in tests, for one simple reason. The ranges change according to actual conditions such as the level of mineralization of a given site or the soil moisture, and therefore the measured numbers can and will change rapidly. There is nothing sadder than when the owner of a new detector reads somewhere in a test or review on the Internet that his machine takes a Bolshevik crown in 28cm, he then practice burying the same coin in some 23 numbers and ... never mind. Immediately, as an inexperienced searcher, he immediately thinks of 3 logical explanations: 1) the detector is broken and not working properly. 2) I don't know how to set it up and I'm doing something wrong. 3) the guy who described the depth range of the detector and/or the guy who sold it to me wasn't telling the truth and I fell for it. While of course any of these alternatives may always apply, often the reason may be more prosaic. Just the fact that the detector was tested in a different location with different soil conditions than the detector's range is less than his. It is important to note that the differences in range can be in the order of tens of percent, even up to 40 or 50%, depending on different conditions and soil mineralization levels. Personally, I have many times gotten to a place where the detector was unable to find a coin deeper than some 18cm, while at my polygon I was able to detect the same one in 30 figures. Then the next chapter for itself is the soil moisture, or rather the moisture in the soil column. If it's dry like it was this summer, forget about any record ranges (on the contrary, the advantage of dry soil is that you don't hear scrap iron as much). Oddly enough, you don't get those even when it's very wet, e.g. after a heavy rain. As far as range is concerned, the ideal is reasonably and evenly moistened soil throughout its column, where it rains gently for maybe 3 days and then you set off after another 2 days. But the most important factor affecting depth range is the concentration of metal ions in the soil, or mineralization. There is a direct proportion - the greater the mineral concentration, the lower the range.
Finally, I went to my favourite field just outside the village, where in the past I found a lot of nice things like coins, sacramentals, buttons, etc. This is probably because there used to be an old road through the field from Krčín's Křepenice, but innot so long ago, the comrades began to mind the creation of the long, wide meadows and so sometime in the 1950s it was used for the creation of the long, wide meadows. In the 1950s they ploughed up the land. I spent about 3 hours in the field with the detector and was really pleased with its behaviour and the results. With the setup described above, similar to the one I run the F75 in, the detector actually behaved very much like that. Sure, the depth ranges are different than a 30k crown device, but ... this new contraption is worth just about anythingwell over 12 grand, so it was foolish to expect the same performance as a professional-grade detector. On the other hand, when comparing, it is possible to find something that no other detector in this class can boast. The Fisher F44 weighs less than 1 kilogram including batteries and is waterproof. Or rather weatherproof as the English term "Weatherproof" could be accurately translated. In practice, this means that although we can't dive with it, everything else this detector can withstand and doesn't mind a storm or rain or splashing or washing.
CONCLUSION
TheFisher F44 is a powerful detector with good depth range, convincing metal resolution and excellent separation. With its 29 cm probe, its design and shape, it has excellent ground coverage yet the weight of the whole instrument is less than 1 Kg. We can adjust the volume including iron volume suppression, of course the sensitivity and there is also the option of backlighting the LCD display even in 4 intensity levels. All settings are made using the buttons, while the individual values can be immediately monitored and checked on the large and clear LCD display. The detector is quickly and easily tuned to the current soil conditions either semi-automatically or manually. For searching in different locations we can choose from 3 preset search modes with 3 tones. But in my opinion the biggest plus of this instrument is the possibility to set Custom discrimination mode, where we can assign to each discrimination category one of 4 tones + variable VCO and then store this setting in memory. In practice, this means that we can get the detector to behave a lot like the best models Fisher F75 Ltd and F75 or F70 with this setup and it really is a blast.If I then throw in waterproofing and a 5 year warranty, I think there is quite a lot of music on offer for not a lot of money.
So how would I conclude this new Fisher product? In my opinion, the F44 is a good, very good detector and I would really have a hard time finding a rival in this class and price range.
The article is included in categories:
- Archive of articles > Metal Detectors - Reviews and Tests > Fisher - Reviews and tests
- Archive of articles > Metal Detectors - Reviews and Tests > Fisher - Reviews and tests > Detektor kovů Fisher F44 a F22
Post


Už to mám,omlouvám se 


Už jsem ho potěžkal a musím s Pavlem souhlasit. Dost muziky za málo peněz. Odladění země je hodně vymazlený.


Za ty peníze je víc než dobrý.


Lidi chci se zeptat je tato mašinka dobra ? Měl jsem v plánu koupit Garrett 250 ale jak vidím F22 tak vypadá že bude o dost lepší než G 250 . Co si o tom myslíte prosím nějaké názory na tuto mašinku díky .