
How to use the Teknetics Patriot metal detector, disguised as an F70
Categories: Teknetics - recenze a testy
Fisher The F70 was the detector that I liked the most out of the whole Fisher range for a long time. The simplicity of setup combined with only slightly weaker performance than the larger F75 promised by the manufacturer was appealing. And as it turned out, also true.
Detector design Patriot is a conservative, three-piece design. Unlike the F70, which came with a 25 cm concentric coil for the first few years of production, the Patriot has been a concentric coil since theThe coil is fitted with a 28 cm 2D coil from the start, which slightly shifts the range and also improves the behaviour in heavily mineralised soils.
The detector is light in both real life and feel when you use it. A battery box with volume control under the armrest contributes to good balance. With the Patriot in your hand, it feels right from the start. With very low power consumption, plus 4 alkaline batteries, you can get up to 40 hours of use. The armrest is adjustable and the length of the detector is sufficient for people over 190 cm. I am 198 cm tall and the detector is just right for me. However, a taller figure would need an extended lower bar.
Detector control
The detector is designed so that everything is accessible in one menu. The simplified operation thus brings peace of mind to those who are afraid of setting up the detector and prefer to work more in "plug and go" mode. Still, there are menu items that definitely need to be mentioned, as just because the Patriot is simple to use doesn't mean it's a dumb detector. We'll cover the recommended settings in the article.

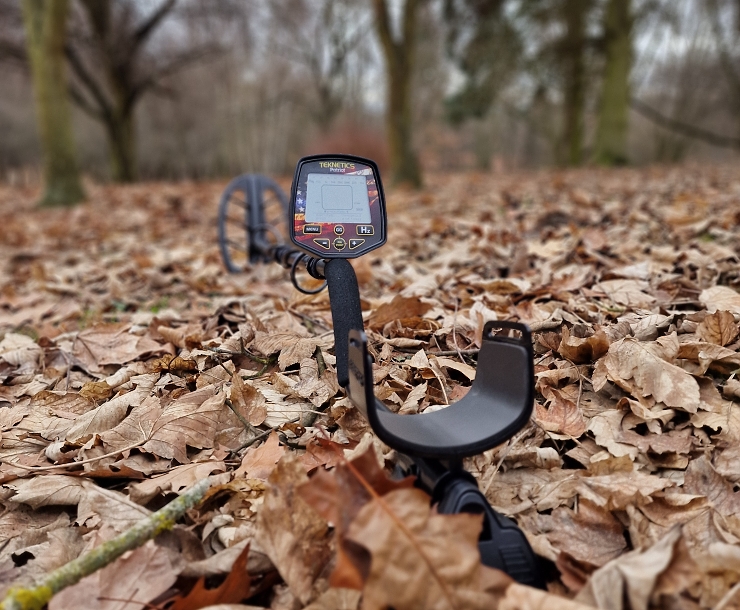
Clear LCD
The Patriot has a simple and clear LCD. There is a bar at the top for setting the discrimination and just below that, the object ID is displayed in large numbers. The two side charts are also large, as is the 6-item menu, which you can quickly access directly from the main panel.
Detector settings
I think we've introduced the detector sufficiently and so we can move on to the most important part, and that's the setup. I'll try to describe everything from the very basics, so I think more experienced searchers will forgive me if some things are just for beginners.
- Batteries - the detector is powered by 4 pencil batteries. The power consumption of the detector is minimal and so the detector literally has a dream battery life. So I strongly recommend always using good quality alkaline batteries.
- Adjusting the length of the detector - When adjusting the length of the detector, you should always make sure that the hand with the detector hangs along the body. The probe will then come out just a little bit in front of your shoes. By not stretching your arm anywhere in front of you, you can keep searching for long hours without fatigue. The fact that the probe is relatively close to in front of your boots forces you to take small steps, so you properly overlap the coil with the previous movement so you don't miss anything.
- Movement speed - Patriot has two speed settings. You, however, should learn to walk about like an old man mowing a meadow. The Patriot is a motion detector, so to be able to detect, you have to move the coil. In general, though, slower movement in a location always yields better results.
- Discrimination - in our conditions, I recommend sticking to setting 4. If you don't want to hear the iron, you can set it up to number 15. It must be said, however, that in such a setting it is much easier to dig out a large piece of iron that reports that it "mixing" the tone for iron and for non-ferrous metals, and at the same time you will worsen the separation properties of the detector in such a setting.
- Speed - there are two options to choose from DE (faster) and SL (slower). I would definitely choose the DE setting to start with. The faster setting is quieter and you should not start on any heavily ferrous contaminated site. The SL setting, which is slower and more sensitive, is the one for such places. Its behaviour can be likened to the jewellery mode of the F75.
- Sensitivity - when the detector is switched on, it is automatically set to 60, which is recommended by the manufacturer. But here it should be said that setting this value is a bit complicated. Sensitivity logically affects the range and sensitivity of the detector. However, it is also affected by the threshold tone setting and the selected audio mode. So for your first walks you can leave the setting at 60, as you will be able to walk almost anywhere in that setting. However, you can walk much higher (75-90), but you need to properly balance the relationship between sensitivity, threshold and the selected mode. Your detector should always be set to be relatively quiet when working. This way you should not confuse minor crosstalk with the target signal.
- Threshold - Threshold as many searchers know it is a constant sound that is set to the edge of audibility. However, Patriot has a silent discrimination mode so you don't hear the threshold tone. Still, it greatly affects the sensitivity of the detector. The higher you choose the setting, the more you add to the sensitivity. However, a high setting will in most cases mean higher levels of noise and crosstalk. So my recommendation is that you try doing a few dozen meters in the field with the sensitivity set to 75 and the threshhold set to 0. If the detector is free of ringing, you can raise the sensitivity value. If it is jammed, you can start lowering the threshhold level down to -4 or -5. And if that doesn't work, then I'd start lowering the sensitivity. I would use a positive threshhold setting primarily for tracking. So the threshhold setting primarily affects sensitivity to the smallest targets and only slightly affects range.
- Tones/Modes - Tone settings are not just about what audio response you will hear, they are also working modes. For first outings, we can definitely recommend the 3-tone mode and once you get a bit comfortable, test the 2F mode, which I think is the best the detector has to offer.
1 Tone - all metals will emit the same mid tone. This setting can be used on sites with minimal targets
1F - all metals have the same response, but it is modulated by signal strength. Things near the surface have a strong response and things deep have a weak response. The mode can be used just like single tone, except that you can more easily estimate the depth and size of the object.
2F - definitely my favorite mode. Irons report a short deep unmodulated tone, color targets a higher and modulated depth of imposition. Many searchers who specialize in "relic" searches prefer this mode.
3Tones - low tone for irons, medium for foils, small silvers, zincs and high for targets with the highest conductivity. Preferred by beginners, this mode is simple and straightforward and can be recommended for anyone starting out with a detector.
3H - Same mode as 3-tone, only nickel alloys have a high tone. This mode is especially helpful to prospectors in the US where nickel prospecting is a classic. In our country, this tone is used to mark the communist 2 Kčs, 5 Kčs or also the Austro-Hungarian 10 and 20 pennies.
4 Tones - This mode has an extra tone and is useful for finding coins in places with more targets.
4H - Same as the 4 Tone mode, except that the Nickel has a high tone.
DP - Delta Pitch - This mode uses two tones, both modulated by ID number. This gives you a very rich audio response and allows you to "listen" to a lot of targets. The mode also allows you to more easily identify problematic targets such as plugs.
- NOTCH - notch discrimination. With this feature you can exclude virtually any subject. I have to say that I'm really not a fan of this discrimination option and basically never use it on any detector. However, the feature can serve well in places where, for example, there is some specific garbage that keeps giving the same ID over and over again. I still prefer to "listen" to it though.
- Ground influence tuning - you always need to find a patch of clean ground before you start searching, then press and hold the Ground Grab button while moving the coil vertically between 5 and 30 cm above the ground. The detector will set the ground itself.
- The last item I should mention is the return to factory settings. Although the Patriot is very simple, perhaps especially in the beginning, this can come in handy. That way, if you get tangled up in the settings and want to go back, it's not too difficult. Press and hold the ground grab and menu button at the same time. Then turn on the detector and wait for the two 8's to appear on the LCD. The detector is now in factory settings.

I hope this has given you a thorough introduction to the Patriot. Teknetics we will be making instructional videos during February, which you can find on our YouTube channel. The Patriot is a detector that should definitely interest all those looking for a detector under ten thousand. After all, it's a detector that just a few months ago was priced at 20,000 CZK and now sells for less than 9,000 CZK. Thanks to the fact that the manufacturer slept a bit and did not come to the market with a new multi-frequency detector, searchers can get a slightly older, yet top-notch detector for literally a dream price.
The article is included in categories: