
Tak teda jake jsou odporucena nastavení na hledaneni v mori??? Komplet i s limitama od Vás?
Setting Ferrous Limits at Manticore
Categories: Detektor kovů Minelab Manticore
Correct setting of this feature is an essential thing when setting up Manticore and since we get the largest number of questions about setting it up, we will dedicate a separate article to it.
What does the Iron Limits feature actually do?
The basic feature is that all items that go into Limits will be marked and reported to us as iron. But that's only part of what the feature can do. The upper limit is used to discriminate between classic nails and generally unproblematic iron objects.
But the lower limit is something else entirely. This allows us to "lock" problematic iron targets into iron, and also plugs, etc. And at the same time it acts as "Iron Bias". The main benefit then is that we don't have to strengthen or weaken this filter on some scale, but we can create a shape in the graph that hides unwanted targets, while keeping the strength of the filter as low as possible. This in turn has a positive effect on the range for targets that are already on the edge of identification.
Enough searchers, especially those who have some experience with detectors like the Minelab CTX 3030, tend to consider the detector response as similar to what the CTX 3030 did, where the resulting point on the graph was actually the result between the FE and CO axes. But with the Manta, you are dealing with a much "smarter" function which also provides a significant evaluation just in the graph.
Practical settings
From dry theory, let's now move to practice. The first picture shows my most common limit settings. As you can see at a glance, there is literally a window on the left side of the chart. And it is in this section that all low conductivity targets such as small Ag, bronzers, small gold jewelry, etc. are reported. At the same time, the lower limit is set to help me correctly identify most of the problematic iron targets. While just noting that I basically never go discrimination into silence, but always have the "iron sound" on, I just set the volume level quite low (7).
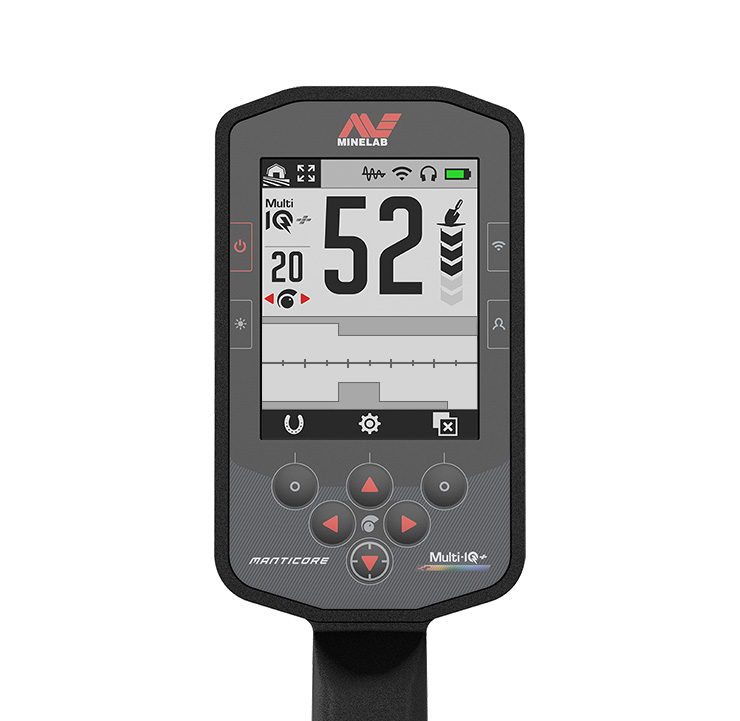
Fig. 1 - Elmara's standard settings
Why make such a large open "window"?
Tiny targets at greater depths will no longer appear to us as a nice little ball on the dividing line, but will report in this space either at the bottom or at the top.
Important: If my target moves from the bottom of the chart up to the line, you are in alkaline soils. If it is from the top to the bottom we are moving in ferromagnetic soils. This is a good thing to adjust your detector settings to, as you have a lot to gain. (Figure 2, 3).


Fig. 2 - alkaline soils. Fig. 3 Ferromagnetic soils
From the pictures we can clearly see that if we keep the lower limit in some high setting, we could lose a lot. However, there are far fewer soils with so much iron than alkaline soils. The result on the graph is then only illustrative, of course it depends on the object and the depth of deposition. The smaller the object and the deeper it is, the less pronounced the result on the graph is also.
Thehump in the lower limit: In the picture the hump in the lower limit is marked in which problematic irons, iron rings or also beer caps appear. It should be noted that, depending on the soil conditions, this hump sometimes needs to be moved either more to the right or more to the left.

Limits and stabilizer
The first update brought an interesting positive change. On highly ferromagnetic soils, you may occasionally encounter the detetor giving tiny iron edges. These used to show up on Manta as tiny iron signals on the upper limit (its top edge). The update has improved this significantly and also added a stabilizer function that can improve the detector's behavior even more.
Coincidentally, earlier this week our friend Vasek found himself at one of these crazy sites. We had already tested the detector there before the update and the iron echoed a lot in the upper limit. Now after the update, even with zero stabilizer settings, the situation has improved incredibly. On setting 2 the detector is literally like a lamb. Without much loss of depth, the stabilizer can be used up to number 3.
Video
In the video you can see the change of behavior in such an extreme location with and without the stabilizer on. Unfortunately Vasek didn't have the original first version of the software available anymore. There you could see how big the shift is even without the stabilisation on. The quality of the video corresponds to the fact that we asked our friend, who was there by chance, but at the right time, to record it on his phone. :)
Settings by Jaccob and Vasek
As it is clear at first glance, the limits allow much more and you can also walk basically sharper or also make the detector a bit more "tight".

Jaccob - settings for small targets and the finest gold

Jaccob - setting to pure forest in the preset option (this is the first option in the limits, where you just increase or decrease the upper and lower levels).

Vasek: no lower limit. This means a very sharp mode, where the seeker should have something in place.

Vasek: here the lower limit is already active and will help you in identifying large iron targets, rings etc.

Vasek: significantly tightened limits to locations with fewer iron targets and basically no possibility to get confused even on targets like iron rings.
Conclusion
What to add in conclusion. We will certainly continue to address this topic, and I think we will keep coming back to setting limits as we discuss other points in the setup. Since we keep getting questions about "our setup" I'll add my current "Forest" here. Since even though I am a fielder, now that the fields are gone I too must attend to the places where the Klos, Mosquitoes and Badgers rule. :)
- Sensitivity around 23. I like it when the detector is slightly unstable and sometimes it "grunts". In many places it is possible to go 25-26. Here you have to take into account the power of the detector, which is really considerable. If the site is packed with iron, a high sensitivity setting is counterproductive. It may be that the only thing you add on are deeply buried irons.
- Volume - if I go without headphones, it's at 25
- Mode - Field/forest basic
- Interference cancellation - automatically at the start of the search
- Ground tuning - manually, if the number is higher than 30, usually more mineralization will change and then I turn on automatic balancing
- Recovery rate - 5
- Discrimination pattern - always all metals
- Limits - see Figure 1
- Iron volume 7, iron pitch 1, stabilizer 0 or 1
- Tone audio - 1 band multitone. I cut down a bit to lower tones than the factory setting
- Audio profile - speaker normal, headphones advanced
- Operating frequency- always multi
- Language - English
- Vibration - off
- Backlight lcd, keyboard - I'm experimenting with the automatic function right now
- Iron identification - underline only, I haven't found the red numbers yet
Video - Manticore to screw 4 - Manual editing of ferous limits
The article is included in categories:
- Archive of articles > Metal Detectors - Reviews and Tests > Minelab – tests and reviews > Detektor kovů Minelab Manticore
Post


Petr už píše článek, který bude jenom o hledání u moře :) Počítám, že na webu bude v neděli nebo v pondělí. :) Už tady stříhám videa ze Saint Tropez :)

To už bude freexxx doma od moře, tak to mu moc nepomuže, ale na duhou stranu už par goldíku vytáhl tak to snad přežije :) to mě se to bude hodit za 14 dní :)
čim driv tim lepe ted se lecim mam rozervane odtlaky na nohou z hledani masakr... mate najeke typy co na to jek se tomu vyhnout. k čemu detik když nemužes hledat  6 hodin ve slane vode denne a sem vyřizeny... ale posledene 2 dni to dorazim
Petr se vrátil dnes. Všechno má nějaký čas, pokud to nemají být hámotiny. A to ať raději dělají jiní :) všechny věci, které sem dáváme máme nachozené a otestované. 